Showing posts with label differentiated instruction. Show all posts

Sunday, December 2, 2012

UNfortunately, gig sticks are still necessary. Fortunately, they can help transform your classroom!


Gig stick: aka, mini-USB drive, thumb drive, geek stick, flash drive, memory stick, jump drive, pen drive, I'm sure there are many more synonyms out there for this ubiquitous little device, which is not platform dependent.

First, let me say, I can't think of anything more uninspiring to be doing right now than writing a post about gig sticks. 

Monday, November 26, 2012

GoAnimate - a quick way to teach (and re-teach) quick ideas

GoAnimate is another one of those great free web tools that have the potential to bring your lessons to life.  It's one of those tools I really love because it creates immediate engagement, is useful for all kinds of topics, all kinds of lessons, and all age levels, and it's very very fast and easy!

Tuesday, October 2, 2012

Running Low on Excuses - Discovering the Technology Integration Matrix

It's hard to believe, but at this late date in the year 2012, many of our schools still have a long way to go in terms of integrating technologies into our classrooms.  However, with the advent of new devices and web tools, along with a host of new research and publishing of best practices, the path is getting more obvious and accessible all the time.  Schools are running low on excuses for not taking the tech leap.

A new tool that really lays out a clear path is one I discovered last year, that I believe can become a really valuable resource to teachers, schools, and districts. It's called the Technology Integration Matrix. It was developed by the Florida Center for Instructional Technology, and the purpose of the matrix is to help teachers and schools of students in k-12 learn the stages of technology integration that seem to be most effective with student learning. I think that for teachers who struggle with technology - those who are tentative or fearful, a tool like this can be a real game changer.  In a sense, it is a tool that holds your hand through the process, and calms reservations and fears like, "am I doing this right?"

Even better is the interactive format in which the matrix is constructed.  Each cell in the matrix has at least one or more videos which illustrate the integration of technology in classrooms where only a few computers are available and/or classrooms where every student has access to a laptop computer. For schools or teachers who hesitate because of lack of access, this is a fantastic feature!

Besides just suggesting ideas, the matrix has built in models for teachers to explore specific ways technology can be integrated meaningfully into the classroom.

To date, this is one of the best resources I have found on the web for technology integration in education.  Please help get the word out to teachers and schools about this great resource! 

Thursday, September 27, 2012

What I've Been Using Lately - Screen Casts

I know I know, screen casts are nothing new.  I've been teaching middle school students how to use them for several years now.

Usually at some point during the year, almost every student in one of my tech classes wants to share with me about a new tool they have found that they are very excited about.  Enter - screen casting! This is really an ideal time to show them how to screen cast, and then have them create a screen cast showing off their new tool, and describe how they are using it.  They share these with their class mates, post them on their blogs - fun all around.

I don't know why it's taken me so long, but last year it finally occurred to me that I was spending way too much time searching around YouTube and Vimeo for the perfect short instructional videos to post on my course sites.  One day that bell went off in my head and I said, "Duh, make your own!" I have been a screen casting fool ever since. Here's an example of one of my Hollywood-worthy screen casts about adding a gadget in Blogger.

Why is screen casting better than making a regular instructional video?

One word - time.

I've made plenty of regular instructional videos over the years using my camera and iMovie, and I love them and reuse them at every opportunity.  However, the main downside is, they are more time consuming to make.

It takes very little planning to make a good screen cast. Here are the stages for making a basic screen cast:
1. have a general outline of talking points - if you don't, a lot of your screen cast will be sounds of you going, "aaaaand, uuuummmmm, sooooo," and so forth.
2. Have the pages and tabs you are going to use already open. No sense wasting screen cast time waiting for your lethargic browser to load a page.
3. Keep it short - focus your screen cast on ONE thing.  This is infinitely more useful for students, and far more flexible for you in terms of being able to use the screen cast over again.

What to use?
Nowadays I primarily use Screencast-o-Matic, because it's easy and free.  However, there are other good tools out there. Two others I have used quite a bit are Jing and Screenr - both very easy to use.

Sunday, December 11, 2011

Some help for teaching with your iPad

Earlier this year I came across this great wiki called teachwithyouripad.  For those of us using iPads in class for the first time this year, this simple wiki is a link to a wealth of possibilities for helping students to use these as true learning devices.

On the main page of the wiki are four short sections, from the simple (#1. What is an iPad?), to the more useful for those of us who have fully implemented them (#4. How do I teach with it?).  The number 4 section has one link, which opens to a list of 14 sample projects, links included, that could be easily implemented into any classroom.

The bottom of the main wiki page includes a link to a full "Teach With Your iPad" online  newspaper, which seems to be regularly updated, and is a wealth of ideas, articles, and app lists for all grade levels and subject areas.

I really like that none of the options or projects presented are complicated. The iPads are a pretty straightforward device, and both the wiki and this online newspaper seem to be in keeping with the idea of keeping the mystery OUT of them.

Tuesday, February 22, 2011

60 Sites


I recently did a fun presentation at the ASTE Conference (Alaska Society of Technology in Education). Usually when I do these it is more of a "how to". Those are fine and I like to share share share, but this year I decided to do something fun. Teachers, including myself, like good resources. At any kind of conference, we love those little sessions where someone is just giving us some straight up good resources - it's like free candy. That's what I tried to do this year in my section called "60 Sites in 60 minutes" - it was the free candy session. Here is the link to the wiki I put up for the sites - all links are embedded. Enjoy!

60 Sites in 60 Minutes

Tuesday, September 8, 2009

Use podcasts to make student assignments superfast!


I think I have blogged about this before, but I think this one's worth a repeat because it is such a huge time saver, not to mention a great way to differentiate instruction for your students. It's...podcasting! Contrary to popular belief, podcasts are not the domain of super-fancy special projects - they're everyday stuff. Making them is so so easy - easier than you can imagine, and believe it or not - faster than the way you are making your assignments right now!

First I'll tell you how I use it as a time-saver, and to differentiate, then I'll tell you how to do it.

Using podcasts as a time-saver:
A big way I use podcasts is instead of worksheets, plain and simple. If I want my students to answer questions about something, respond in a certain way, do a simple activity with a partner within the assignment, etc. a podcast is a quick and easy way to do this. I simply create a quick podcast then load it onto an iPod or 2 or 3. Making assignments this way is almost the equivalent of me sitting one-on-one with a student, and talking them through a series of activities. Sure you could do the same thing on a work sheet but that's soooo much typing, and for students that's soooo much reading - a major barrier for some.

Sure there are ways to make fabulous, glamorous podcasts - but what I'm talking about is simple, music-less, down and dirty, one-take kind of stuff. Students can easily make up a missed assignment without you having to repeat or recopy. Very easily adaptable for younger and older students, and a great way to introduce very young students to working independently. You can also easily read a children's book into a podcast and ta-da! You've created a listening center podcast for students to read with. Students can create them too!

Using podcasts to differentiate instruction:
I can make different podcasts for students quite easily - after all, I'm not typing up worksheets, I'm just talking for about 3 minutes per assignment. Students can respond to the activities on my podcast any way I direct them to - through writing, completing some kind of project, doing an activity or discussion with a partner, anything! Best of all, they can pause me and replay me as many times as they need. I can even lecture a little bit!

Quick! Create a podcast in 8 simple steps:
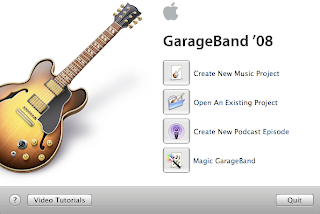
1. Open GarageBand, click "Create New Podcast Episode",
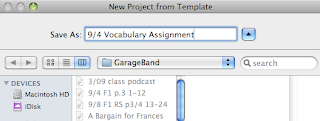
2. Name your project/assignment with an identifier you'll remember or recognize.
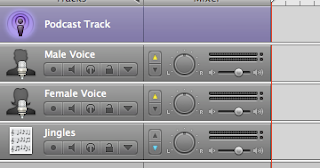
3. Once in your podcast screen don't be confused by all the bells and whistles - you won't need them. Just click on the head of "male voice" or "female voice" whichever applies to you.
4. Then click the round red button and start talking.

You don't have to be perfect, but have some idea of what order you are going to do things in. Make sure you state things clearly and pause a little. Make sure you say item numbers so students know when you are moving on to a new activity or problem. Pause for a second or two so they have a chance to pause the iPod.

5. Click the red button again when you're done.

6. Go up to the Share menu and click "send song to iTunes."
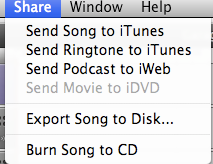
7. Name your playlist appropriately so you can save more than one thing to it in the future.
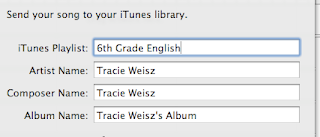
8. Once you've done this your podcast is on your iTunes. Simply go there and the next step is to just sync your "playlist" with your iPod like you normally would. That's it - done! Wasn't that easy?

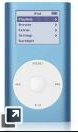
Where to get iPods? I have saved a couple of my older ones - I use an old iPod Mini,
my last Nano I had before I got my iPhone,
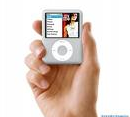
and a 4G Nano I bought on ebay last year for $40.
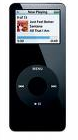
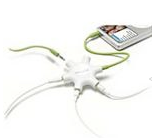
Any old working iPod will do. How do I let more than one kid listen? I use Belkin splitters I picked up at Fred's for $20 each. They split to five inputs - so 3 iPods become 15!
Once you do this you will see how easy it is . It is so much faster than making worksheets or typing up assignments, and so much more versatile.